Thursday 23 March 2017

Dynamically Change Background color using Angular JS.

In this tutorial we are going to see how to change background color of an Application using AngularJs.
So let’s get started.
To know about prerequisites needed to run this example see our previous post.
First create index.html file shown as below.

<html>
<head>
<script src="angular.min.js"></script>
<script type="text/javascript" src="script.js"></script>
</head>
</html>

The code shown above will add files require to run our angular application.
Next add an textbox which takes input color from user as shown in below,

<input ng-model='bgcolor' placeholder="Enter a color name" />

Where ng-model is a directive used to assign the color value inserted by user to bgcolor property.
next add style to set background color to value inserted by user which is model bgcolor

style="background:{{bgcolor}}"

Also add ng-controller and ng-app directive to our html file.
So final index.html will look like,

<html ng-app="myModule">
<head>
<script src="angular.min.js"></script>
<script type="text/javascript" src="script.js"></script>
</head>
<body ng-controller="myController" style="background:{{bgcolor}}">
<input ng-model='bgcolor' placeholder="Enter a color name" />
</body>
</html>

The code written in script.js is for attaching module and controller to the view index.html.
So add module to our script.js file like this,

Var app=angular.module(“myModule”,[]);

Where myModule is our module name and [] is for  dependencies.Currently we are not using any dependencies so it will be empty.Now register the controller with our module like this,

app.controller(“myController”,function($scope){
});

Our application is now ready to be executed.
Now take input from user as shown in below image

changes background when color value is entered

As soon as we enter yellow in textbox, the background color is going to change as shown as above
So this is how we can change background color dynamically by using AngularJS.

If you have any question regarding this you can write us at testyourcoding111@gmail.com

Create your First Angular Application Beginner's Level

    Hello everyone,In this article we are going to see what is angular JS? How to start coding with Angular JS. So let’s begin with introduction to angularJS.
     Angular JS is Javascript framework introduced by Google in 2012. It is an extension provided to HTML tags with ng- directives. We know that html is used for creating web Applications which are static applications. But to create dynamic applications we can use Angular JS.
     One more important thing is Angular JS uses MVC Architecture to create applications.to know more about MVC architechure Click Here.
   
   Prerequisites:
      1. Web Browser
      2. Server to run Web Application.
      3. Text Editor- Sublime Text editor is recommended.
      4. angular.min.js file to run Angular Applications. You can download it from here.

-    So now let’s start with coding our first angularJS application.
Create index.html file as shown as below:

<html>
<head></head>
<body>Hello</body>
</html>

The code above shown is html code used to show text “Hello” .
Now we will see how to use angularJs to print text ”Hello”.
We will need to create script.js file which contains AngularJs Code as follow.

var myApp=angular.module("myModule",[]);

which is used to create a module.
A module is container of our application which is similar to main method. This will be starting point of our application. Now create a controller for our application as:

var myController=function($scope){
$scope.message="String msg";
}

Controller is used to for retrieving model and attached it to our html view. Model is nothing but the data to be retrieved from db and to be displayed in View. Here $scope is an object which defines scope of controller within the view.
With the scope variable we can attach a value to the property message as,

$scope.message="Hello";

Now next step is we have to register our controller myController with module as

myApp.controller=("myController",myController);

Up till now we have seen,

var myApp=angular.module("myModule",[]);
var myController=function($scope){
$scope.message="String msg";
}
myApp.controller=("myController",myController);

Now modify index.html file to add created module and controller to our application
<html ng-app="myModule">
<head></head>
<html ng-app="myModule">
<head></head>
<body ng-controller="myController">
<p>{{message}</p>
</body>
</html>

Where ng-app is a directve used to bind model with our html view.Here myModule is a name of our module created in script.js file. Also ng-controller is directive used to associate our model with html view. So we can print data to be retrieved from data base with the help of property attached to scope variable.
To print Hello text we have to use our message property as {{message}} within body section of our ng-controller. The scope of message will be within opening and closing tags of ng-controller.

add script.js and angular.min.js file within head of our html to make our AngularJS application running.
So final code will be

index.html

<html ng-app="myModule">
<head>
//include angular files
<script src="angular.min.js"></script>
<script src="script.js"></script>
</head>
<body ng-controller="myController">
<p> {{message}}</p>
</body>
</html>

script.js

var myApp=angular.module("myModule",[]);
var myController=function($scope){
$scope.message="Hello";
}
myApp.controller=("myController",myController);

So now you will see output as
Hello

This is how you can create your first Application.If you have any query you can  write us at testyourcoding111@gmail.com 

For more references, goto
https://angularjs.org/
http://www.w3schools.com/angular/
https://www.youtube.com/user/angularjs


Monday 20 June 2016

Introduction to GitHub:An Open Source Community for Developers

Most of us have heard about GitHub as an open Source Community for Developers, but what does it actually means and how we can get started to use one of the popular platform used by many developers to make contribution to open source projects. So let’s get started,


GitHub is a Version Controlled System mainly used for source codes. In simple words, It can be used by developers to put there codes of project at one place which can be accessed easily by there teammates. So they can change the code as per there requirements and get the job done easily. I know many of us will be confused due to this so let’s take an example.

Suppose, in college you are working on Group project with your team members. You have divided your tasks in your team. Now you have finished your task and want to combine your work with the remaining work done by your team members. For that you asked your team for project codes and they given you.but suddenly you realized that you have to make some changes to your own work but it will be difficult task for you to do that work again from certain point which also affects the work of your teammates.

Therefore imagine a situation where you have one copy of your project which can be accessed by all of your team members so that they can make required changes without affecting previous code, it will be very easy as compared to your method. So here comes a GitHub. With the help of github we can put our projects folders on web, can make changes to source codes and access these changes by retrieving it to your local system by using command line tool known as Git. It consists of some commands in order to push your projects on GitHub server, make changes to your project files and pull back those changes back to your local folder.for more information about how to use github command line tool,go to


You can also download the different projects provided by different developers and organisations and can contribute to there project by providing bug fixes, error corrections or by adding new features.

Here are some references for getting started with Github.


Friday 3 June 2016

How to improve battery performance of your laptop.


Hey everyone,Sometimes you have been facing problem of draining your laptop battery very quickly.
 So, today we are going to see some ways to extend battery life of your laptop.
1.  Switch to Power Options:
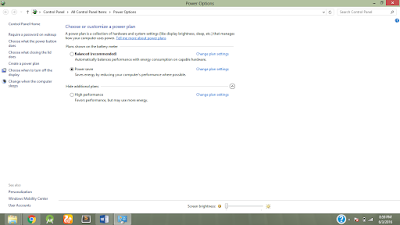
This can be done by right clicking on battery icon present at right side on Taskbar. There are some options like,


Balanced (Recommended):  It is in-built Recommended options but truly speaking its minimize battery’s life. The energy consumption with hardware is responsible for this.so avoid this power option.
Power Saver: This option save energy by reducing your computers performance wherever possible. Also the heating issues faced by most of us is also reduced, so it is highly recommended to use Power saver. Approximately It increases time up to 45 to 50 minutes compared to Balanced mode.
High Performance: This is usually of no need because its drain your battery by consumption of energy.
You can also change plan settings by clicking on link as shown above, but it is optional and the options they specified are enough.


       2. Improve performance of your laptop:
You also need to optimize performance of your laptop or PC in order to run it smoothly. This can be done by cleaning the temporary files by pressing windows +X  then select run option like,

  
Then type %TEMP% in run and by clicking OK you will see temp files on your screen. Delete all files permanently by pressing shift+del . Now you can observe performance increased in some manner.

       3. Disk cleanup:
It is another way to improve performance of your system by cleaning junk files. This can be done by à
Go to My Computer àLocal Disk C(Drive)àright click on C drive and Go to property like,
Then choose Disk cleanup and window will popup like this ,

Then select file to be cleaned up and click ok. In this way unnecessary files will be deleted which enhances system performance.


 Some Useful tips:
Never charge your laptop to 100%, it makes cell of your battery weaken. And make sure to remove plug when battery charges upto 80-85%.
It is not a good idea to work on your laptop when you are charging it. Also close the un-necessary applications that are running in the background by using Task Manager.
Don’t use screen savers, it drains battery very fast.
Make sure to clean battery by using dry cloth or with the help of cotton wools atleast once in month.
So by following these above simple steps you will significantly see the performance is improved of your laptop.


Sunday 15 May 2016

Program For Binary Search By Iterative and Recursive way.

In Binary search algorithm, we are going to divide a given array into two parts and solve these parts iteratively.For this we are going to find mid element and compare it with element to be found. if it is found we are going to return position i.e(mid element). If element to be found is greater than mid then we are going to set lower bound to mid+1. If element to be found is less than mid then we are going to set upper bound to mid-1. 

Program By Iterative way:
#include<stdio.h>
void main()
{
   
    int arr[20],i,n;
    int h,l,mid,x;
    printf("Enter no. of elements");
    scanf("%d",&n);
    printf("\nEnter array Elements:");
    for(i=0;i<n;i++)
    {
        scanf("%d",&arr[i]);
    }
   
    printf("\nEnter no. to be searched:");
    scanf("%d",&x);
    l=0;
    h=n-1;
    mid=(l+h)/2;
    while(l<=h)
    {
        if(arr[mid]==x)
        {
            printf("\nElements found at %d Position\n",mid);
            break;   
        }
           
            if(x>arr[mid])   
            {
                l=mid+1;
            }
            if(x<arr[mid])
            {
                h=mid-1;
            }
       
    } 

}

Program:By Recursive Way
#include<stdio.h>
int main()
{
    int arr[20];
    int i,n;
    int h,l,mid,x;
    int result;
    printf("Enter number of elements:");
    scanf("%d",&n);
    printf("Enter array elements:");
    for(i=0;i<n;i++)
    {
        scanf("%d",&arr[i]);
    }
    l=0;
    h=n-1;
    printf("enter element to be searched:");
    scanf("%d",&x);
    result=BinarySearch(arr,l,h,x);
    printf("Element found at %d Position",result);
    return(0);

}
int BinarySearch(int arr[],int l,int h,int x)
{
    while(l<=h)
    {
        int mid=(l+h)/2;
        if(arr[mid]==x)
        {
            return(mid);
            break;
        }
        if(x>arr[mid])
        {
        return(BinarySearch(arr,mid+1,h,x));
        }
        if(x<arr[mid])
        {
            return(BinarySearch(arr,l,mid-1,x));
        }
    }
   
}
Note:
The Time Complexity By Iterative way is O(n).
The Time Complexity by Recursive way is  \Theta(Logn).

Saturday 14 May 2016

Worst Case,Best Case and Average Case Efficiency using Insertion Sort.

Insertion Sort is based on inserting a single element in the right for a given iteration.

#include<stdio.h>
void sortArray(int arr[],int n)
{
int i,temp,j;
for(i=0;i<n;i++)
{
temp=arr[i];
j=i-1;

while(j>=0 && arr[j]>temp)
{
arr[j+1]=arr[j];
j--;

}
arr[j+1]=temp;

}
}
void printArray(int arr[], int n)
{
   int i;
   for (i=0; i < n; i++)
       printf("%d ", arr[i]);
   printf("\n");
}

int main()
{
int i;
int arr[]={12, 11, 13, 5, 6};

int n=sizeof(arr);
printf("Given Array is:");
for(i=0;i<n;i++)
{
printf("%d\n",arr[i]);
}
sortArray(arr,n);
printArray(arr,n);
}

Explanation:

Best Case:If an input array is already Sorted. The time complexity will be O(n).
Worst Case:If the array is sorted in reverse order.In this case Time Complexity will be O(n2).
Average Case:If the input array consist of random numbers.The Time Complexity is O(n2).

Worst Case,Best Case and Average Case Efficiency using Linear Search.

Time complexities of any algorithm can be expressed by using best,Worst and Average case.
The Time Complexity of Linear Search is shown By using Program.

//Linear search program

#include<stdio.h>
int main()
{
int arr[]={1,10,30,40,50,60,77,56,57};
int x=57;
int n=sizeof(arr);
printf("Element %d is found at %d",x,search(arr,n,x));
return(0);

}
int search(int arr[],int n,int x)
{
int i;
for(i=0;i<n;i++)
{
if(arr[i]==x)
return(i);
}
return(-1);

}

Explanation:
// Worst case of this algorithm will be Θ(n) if element will be found at last position.
//For Average case,we have to search for all the inputs(taking sum of all inputs) and then divide it by no.of inputs.
i.e.
= Θ(n)
// Best case will occur when element will be found at first position.Best Case means how fast the algorithm can run